

In your WordPress Dashboard, go to Users > Add New, enter their email address as the Username, enter at least their first name, enter their email address again in the email address field, set the Role to Administrator, leave the box checked to email the new user about their account and click Save.
Note: We teach the Elementor page builder inside of the Free 5 Day Website Challenge, so if you’re not using Elementor, refer to your theme’s documentation for how to do this with whatever theme you’re using.
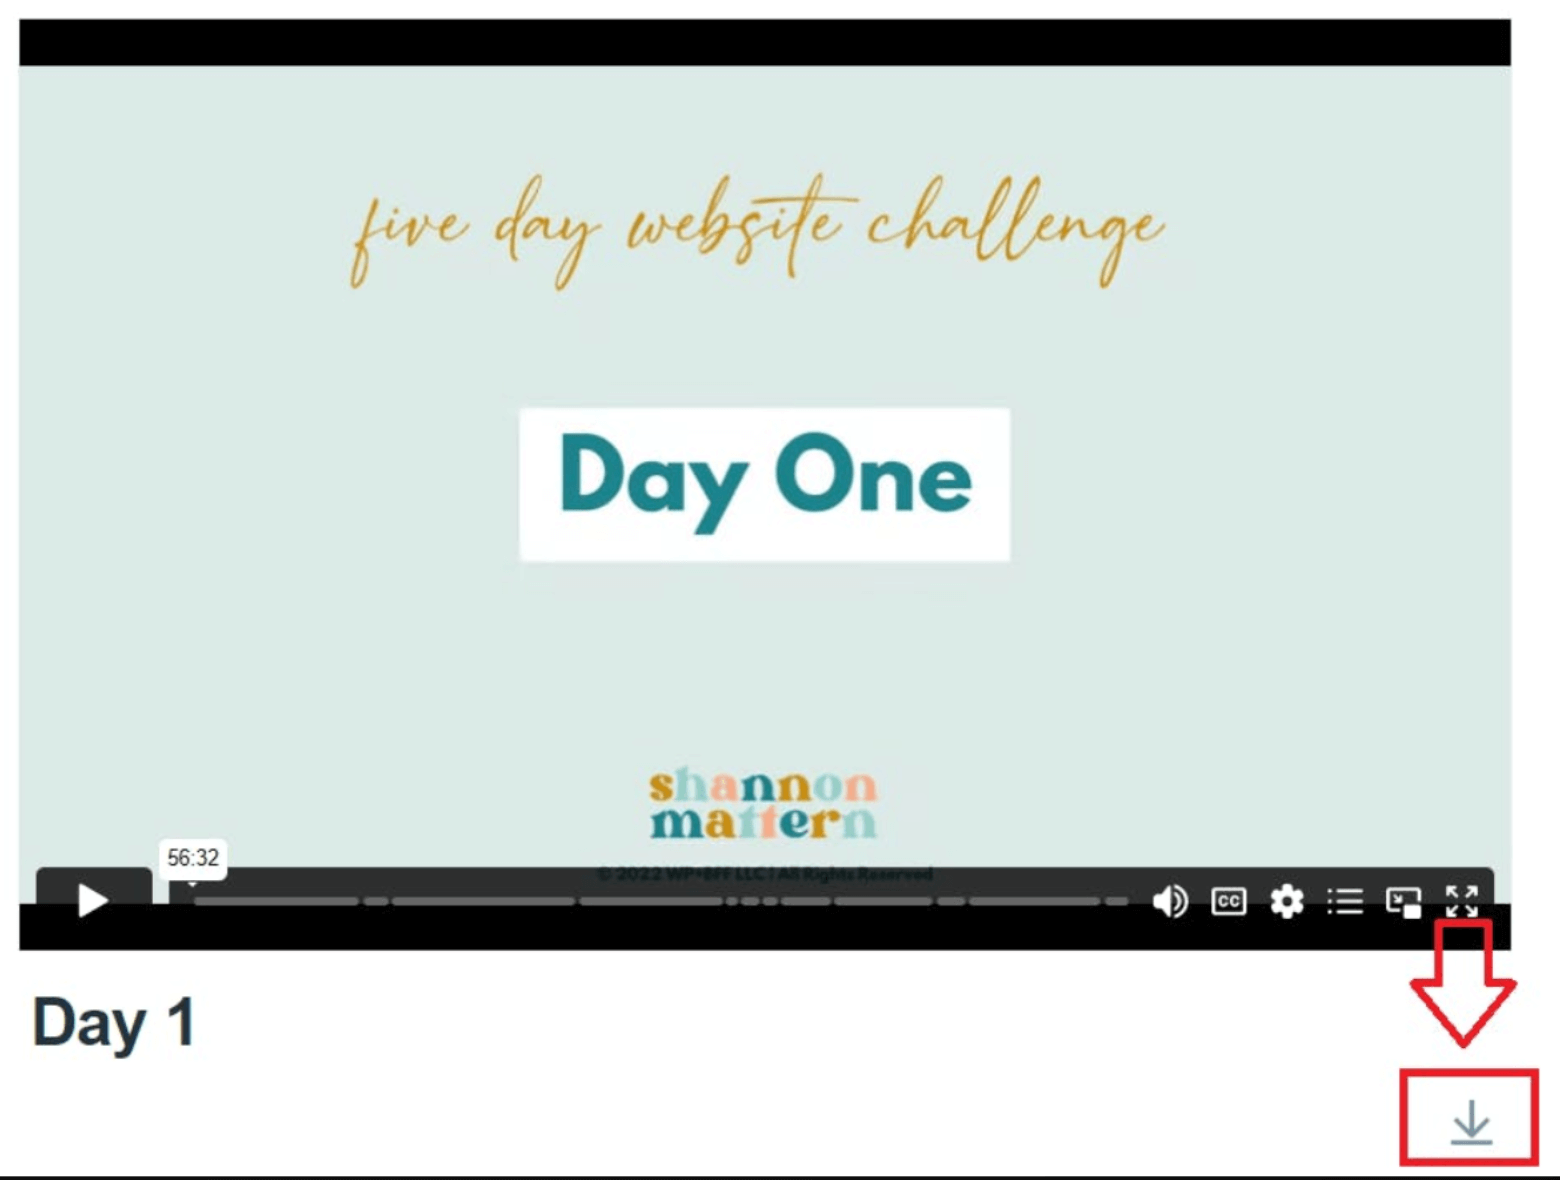
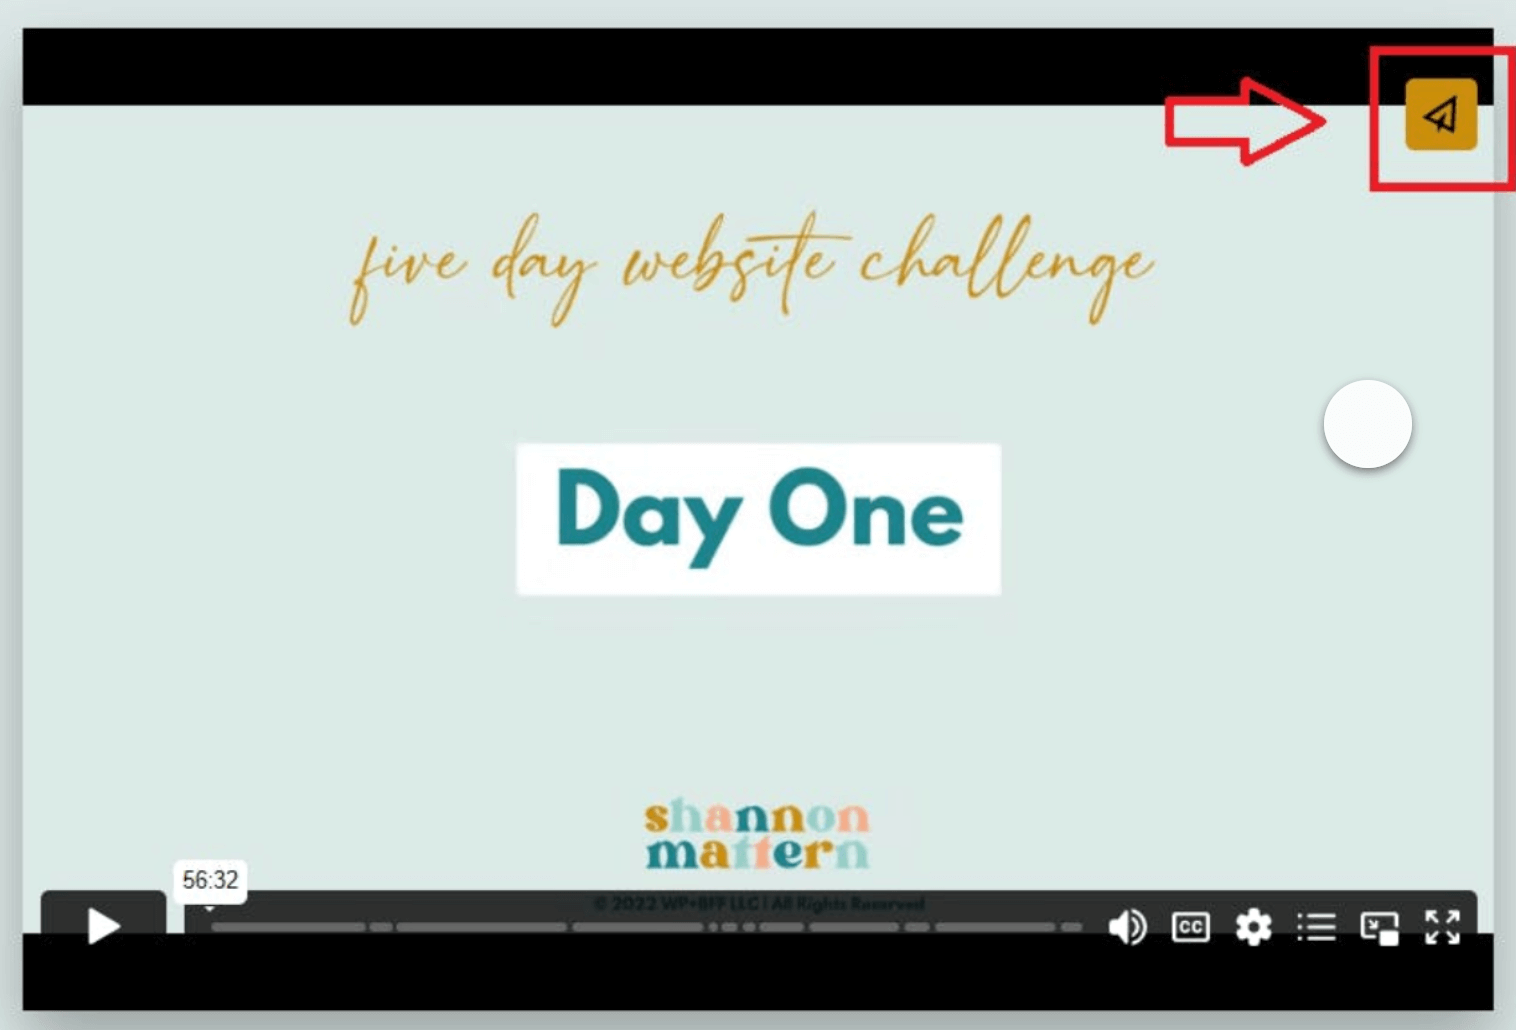
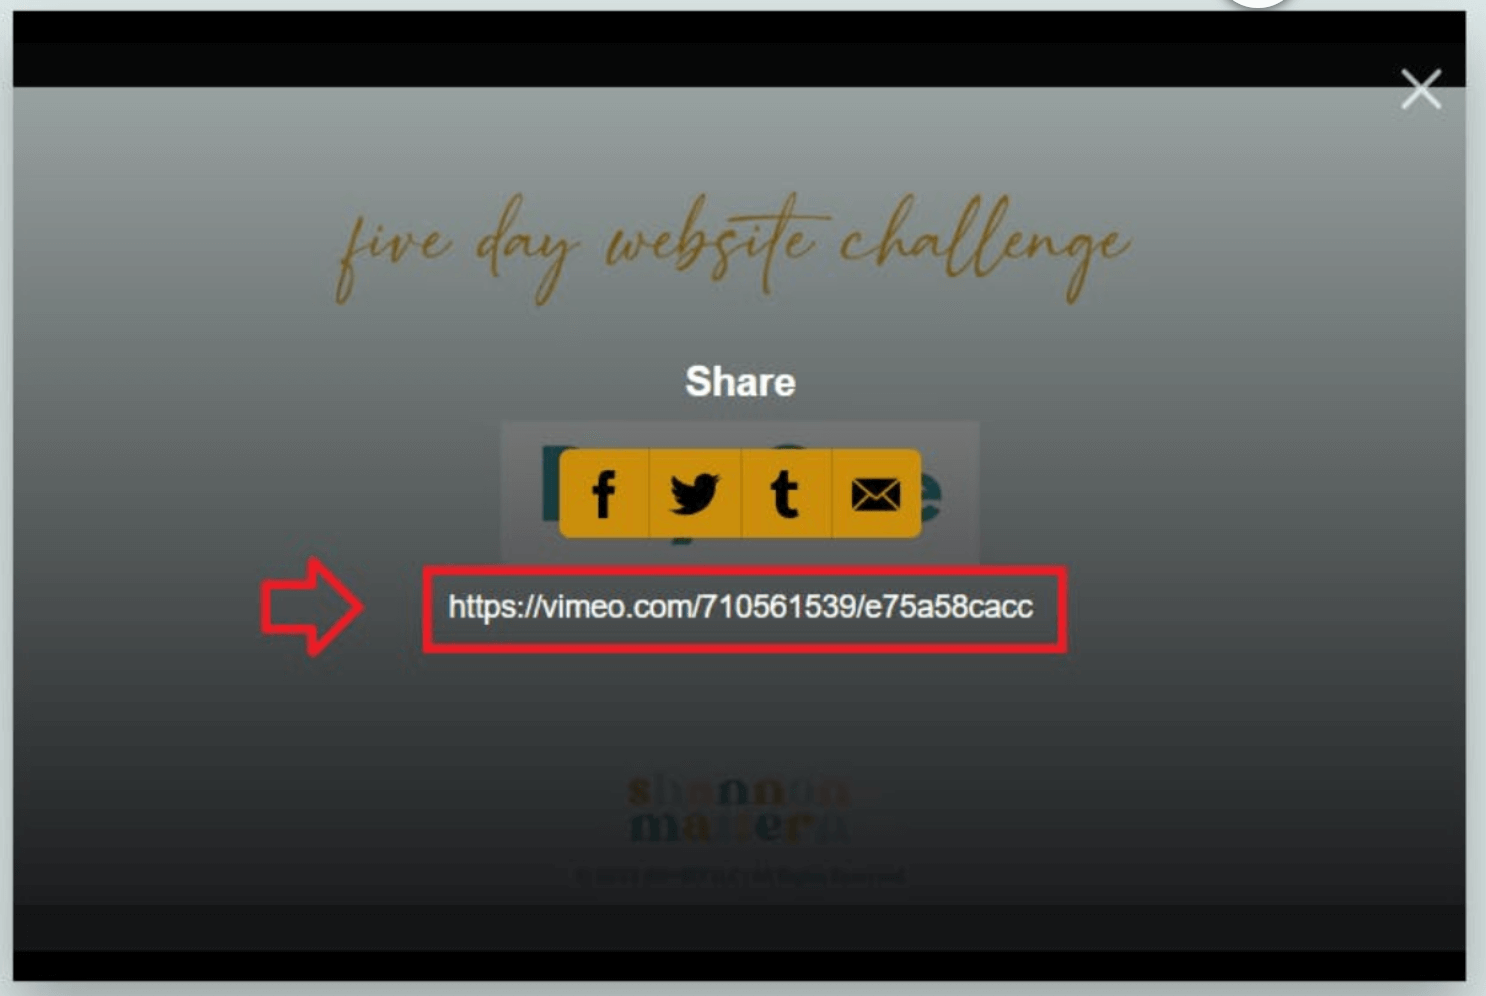
Here’s a video on how to do this with Elementor >>
Note: We teach the Elementor page builder inside of the Free 5 Day Website Challenge, so if you’re not using Elementor, refer to your theme’s documentation for how to do this with whatever theme you’re using.
Here’s a video on how to do this with Elementor >>
Go to https://cloudconvert.com/ttf-converter, upload your font file, choose TTF, and click the Convert button. Once the conversion is complete you can click the Download button to download your font as a TTF file.
Here’s a video showing you how >>
If you have not already signed up for a free account, you can go to https://shannonmattern.com and enter your name and email address to create your free account.
If you already have an account, go to https://courses.shannonmattern.com and click on the icon for the Free 5 Day Website Challenge and log in to access the training.
Note: We teach the Elementor page builder inside of the Free 5 Day Website Challenge, so if you’re not using Elementor, refer to your theme’s documentation for how to do this with whatever theme you’re using.
Here’s a video on how to do that >>
Note: We teach the Elementor page builder inside of the Free 5 Day Website Challenge, so if you’re not using Elementor, refer to your theme’s documentation for how to do this with whatever theme you’re using.
Here’s a video on how to do that >>
We get asked this question a lot and it can be a little confusing! Here’s an explainer video >>
1) how to create forms using Elementor,
2) how to send yourself an email notification when a new form is submitted, and
3) how to save the form submissions to your website + access them whenever you need to.
Here’s a tutorial video >>
First, make sure you’ve already created and published the page you want to add to your menu.
Then, from the WordPress dashboard go to Appearance > Menus, select the menu you want to add the page to from the “Select a menu to edit” dropdown and click the Select button.
Then click on the Pages button from the list of items to the left of your menu, and if you don’t see your page in the list of Most Recent pages, click on Search and type your page name in. Once you see the page you want to add, check the box beside it and click “Add to Menu”. It will be added to the bottom the of the list of pages in your menu, and then you can click and drag it to put it where you want it to display.
Then click Save and your menu item will appear in the menu!
This is happening because you have a default form selected in the ConvertKit plugin which tells WordPress to display that form at the bottom of all your pages + posts.
To turn it off, log into your WordPress dashboard, then go to Settings > ConvertKit, find the “Default Form (Posts & Pages)” dropdown list, and select “None” from the list and then click Save Changes.
When you can’t connect to Site Kit, oftentimes it’s because your domain name has not yet been provisioned (see video 1.21 for more info on this).
We recommend just making a note to come back to Google Analytics Setup on Day 5 and trying again – it’s okay if you skip it and come back to it, it won’t hurt anything!
If your domain has been provisioned and you are still getting an error, please take a screenshot of the error and post it in the 5 Day Website Challenge FB Group along with your error – seeing the exact error will massively help our team to help you!
Note: We teach the Elementor page builder inside of the Free 5 Day Website Challenge, so if you’re not using Elementor, refer to your theme’s documentation for how to do this with whatever theme you’re using.
Navigate to the page and then click Edit with Elementor to open up the Elementor page editor.
In the bottom-left corner of the page, click on the tiny gear icon to open up the page settings, and then toggle the Hide Title option from No to Yes. Save your changes and voila! No more page title!
First, don’t panic LOL! This is a quirk of Elementor that’s annoying but super easy to fix.
Because your Blog page is a special unicorn…
INSTEAD of going to your Blog page and clicking “Edit with Elementor” (ya know, like you do with every single other page you’ve created in Elementor when you want to edit it)…
You’ll wanna go back out to the main WordPress dashboard, click on Templates in the left-side menu, then on Theme Builder, and find the one I had you create called “Blog Page” and THEN click on “Edit with Elementor” and you can edit the layout of your blog page from there.
If you chose image Ratio .6 in Module 4.9 when you designed your Blog Page: use a landscape featured image that’s 600 width x 400
If you chose image Ratio .66 in Module 4.9 when you designed your Blog Page: use a landscape featured image that’s 500 width x 300 height
If you chose image Ratio 1.0 in Module 4.9 when you designed your Blog Page: use a square featured image that’s 1000 width x 1000 height
If you chose image Ratio 1.5 in Module 4.9 when you designed your Blog Page: use a Portrait featured image that’s 735 width x 1102 height (that’s Pinterest Pin Size)
Shannon highly recommends that you invest in Elementor Pro.
You will not be able to follow the Challenge step-by-step without it.
The only reason NOT to buy Elementor Pro is if you’re using a totally different theme and only using Elementor to build specific pages – which we don’t teach in the Challenge and don’t recommend to newbies.
Here’s what’s included in Pro vs. Free
To clear your browser cache, press Control + Shift + R all at the same time (Cmd + Shift + R if you’re on a Mac).
Here are instructions for different browsers on different devices.
Note: We don’t provide support beyond these general troubleshooting steps for plugins we don’t teach inside of the Free 5 Day Website Challenge, so if these steps don’t work for you, reach out to the plugin developer for support or find a different plugin!
If you installed a plugin and you got a message that looks like THIS:
First, like the error says, go check the email address you used when you set up WordPress (check your spam folder too if you don’t see it).
You should have gotten an automated email from WordPress with the subject line “Your Site Is Experiencing a Technical Issue”
This email is going to tell you which plugin caused the error and will give you a link you can use to access your WordPress Dashboard to fix it! Woohoo!!!
The email looks like this:
“Since WordPress 5.2 there is a built-in feature that detects when a plugin or theme causes a fatal error on your site, and notifies you with this automated email.
In this case, WordPress caught an error with one of your plugins, [PLUGIN NAME]
First, visit your website (https://yourwebsite.com/) and check for any visible issues. Next, visit the page where the error was caught (https://yourwebsite.com/wp-admin/) and check for any visible issues.
Please contact your host for assistance with investigating this issue further.
If your site appears broken and you can’t access your dashboard normally, WordPress now has a special “recovery mode”. This lets you safely login to your dashboard and investigate further.
https://yourwebsite.com/wp-login.php?action=enter_recovery_mode&rm_token=v9QmoQFGWgWmGfN3lzpk8D&rm_key=zyJJ6ByNlT5wnDe7ZSZx5Q
To keep your site safe, this link will expire in 1 day. Don’t worry about that, though: a new link will be emailed to you if the error occurs again after it expires.
When seeking help with this issue, you may be asked for some of the following information:
WordPress version 5.8
Current theme: Make Child (version )
Current plugin: Titan Anti-spam & Security (version 7.0.2)
PHP version 8.0.8
So you’ll click the link in the email that was sent to you, then from your WordPress dashboard, go to Plugins.
The offending plugin should already be deactivated, but if it’s not, go ahead and mouse over the plugin name and click the “Deactivate” link.
Then, make sure all the rest of your plugins are up to date, and make sure in your WordPress Dashboard > Updates that all the things that it’s telling you to update are updated.
Then try reactivating the plugin by mousing over the plugin name and clicking on “Reactivate”. If your site breaks again, you’ll get another email with a link for you to log in again, and then deactivate the plugin again.
If this is happening with a plugin that we recommend inside the Free 5 Day Website Challenge, go ahead and post in our FB group for assistance.
If this is happening with a plugin you found that we don’t teach in the Challenge, reach out to that plugin’s support team for assistance (or find a new plugin that does the same thing and see if it’ll work for you).
See the answer #21. You can also contact your web hosting company for assistance, or if you’re feeling techie this support article from Kinsta will walk you through the same tech steps your hosting company will try. PS – make sure you have backups before you let your hosting company do anything!!
Here’s a video on how to DIY cleaning up a hacked WordPress site. If this isn’t something you feel comfortable doing yourself, you have a few options:
1) Pay for Sitelock (not my fave option, but they will get the job done).
2) Pay for WordFence (more expensive, but I like them WAY more than Sitelock)
3) Hire one of our awesome techie grads of the Web Designer Academy and stop trying to DIY 🙂 Here’s a directory: http://www.yourdreamwebdesigner.com
Yep, our awesome Web Designer Academy students are super talented not only in web design, but helping you create websites that save you time and help you make more money. Who doesn’t love that? Check out our directory below:
http://www.yourdreamwebdesigner.com
Check out Module 2.2 of the Free 5 Day Website Challenge for step-by-step instructions!
Here’s how I personally choose plugins when I’m trying to automate something, or add some extra functionality to my site:
1) I google “best wordpress plugins for _______” and insert whatever it is I’m trying to do.
2) I pick a few I want to try out from the Google search results and then I search the WordPress Plugin Repository for the plugin and look at the last time the plugin was updated and how many stars it has or how many people have installed it… but mostly I’m concerned about “does it do what I actually need to do?” and if the answer is YES, I’m in.
3) I install them, play around and see if they’ll do what I want them to do. If they don’t, I deactivate, delete and try the next one.
4) If the plugin I try breaks my site, see the answer to #21.
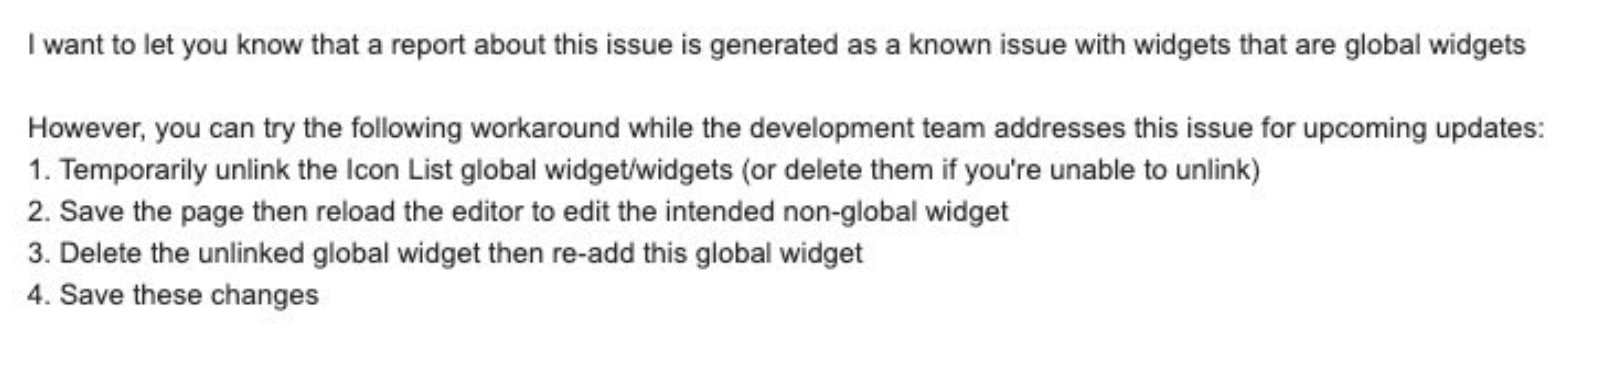
If you are having an issue with your sidebar global widgets, there is a known problem with Elementor right now. While they are working on the fix, here’s a workaround from Elementor’s support team:
First, know that the ConvertKit form won’t show up in the Elementor editor. Save the page and view it live, and see if it shows up in on the live page. If it does, you’re good to go.
If it doesn’t, double check your shortcode. One typo can make your form not show up! It should look like this – make sure you’ve got all the quotes and brackets and slashes and spaces exactly as shown below:
<div align=”center”>[yourshortcode]</div>
If that doesn’t fix it go to your WordPress Dashboard > Settings > ConvertKit and click the “Refresh Forms” button.
If THAT doesn’t fix it, make us a Loom video showing us your shortcode, and what’s happening on the front end when you preview your page and we’ll help you take the next steps.
Line spacing is controlled in the Global settings of Elementor – so to adjust this you’ll wanna be in the Elementor page editor (Edit with Elementor), click on the hamburger (three lines), then on Site Settings to open up the Global Site Settings.
Then click on Typography – and this spacing could be coming from one of two places – either the space below the header, or the paragraph spacing.
To adjust the paragraph spacing, you’ll find a setting for “Paragraph Spacing under the “Body” section, and you can slide that number up or down.
If it’s a heading (like H2) that has the extra space below it, find H2 in the list, then click on the pencil icon beside Typography under H2, and then find the Line Height setting and adjust it to decrease the line height.
Here’s a tutorial on how to do that >> It involves changing the nameservers on your domain name to point to Bluehost (you don’t have to actually transfer the domain to Bluehost, you can leave it where it is and just tell it your website lives somewhere else by changing the nameservers).
FYI – It can take UP TO 24 hours for this change to take effect, so please be patient (although it normally happens within an hour). If you are still not being taken to your new site when you type in your domain name 24 hours after making these changes, contact Bluehost to make sure everything’s fully connected on their side (and let them know you changed your nameservers on your domain to point to them)!
It doesn’t matter if you check it or not – if you want to you can, but checking PAGES should cover it!